
How to French Braid: Step-by-Step Tutorial for Beginners
Generally, the French braid is the foundation that every other braid builds on. Specifically, this tutorial walks through 8 clear steps with the technique RaDona Ludlow has taught for 25 years in her Utah salon. Notably, it covers the four common beginner mistakes and a dedicated section on French braiding your own hair — the hardest version, and the one most people want to learn.
Why the French braid is worth learning first
Generally, the French braid is the most useful braid skill to master. Specifically, once you can French braid, you can do a dozen other styles. Dutch braids, fishtails, milkmaid braids, crown braids — every one shares the same fundamental motion. Notably, the French braid is also the most-requested braid in RaDona's salon for picture day, weddings, and everyday styling.
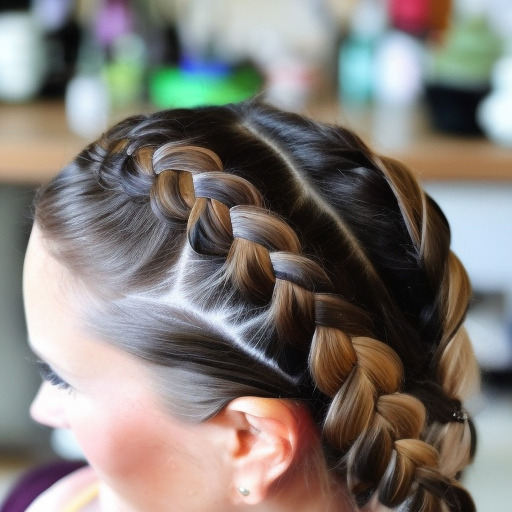
The French braid sits flat against the scalp, blending into the hair. This is the key difference from the Dutch braid, which sits raised. The French braid's flat profile suits situations that need an elegant, polished look. Think bridal styles, work events, school portraits, dance recitals. This tutorial teaches the technique RaDona uses on salon clients, with the troubleshooting tips that prevent the four most common beginner mistakes.
French braiding your own hair is harder than braiding someone else's — but the technique is the same. The hardest part is braiding by feel rather than by sight. This tutorial includes a dedicated section on self-braiding tricks below.
RaDona's French braid technique on video
Watching the braid happen in real time clears up the over-crossing motion better than any description. This video walks through the technique start to finish on a real client. Pause at any step and come back to the photo tutorial below. The flat, integrated finish you see at the end is the signature of a properly executed French braid.
The 4 tools you need to French braid well
Generally, you need four things to French braid well. Specifically, the right tools matter less than the right technique — a comb, a hair tie, and your hands will get you most of the way. Notably, the items below are what RaDona keeps on her salon vanity for every braiding service.
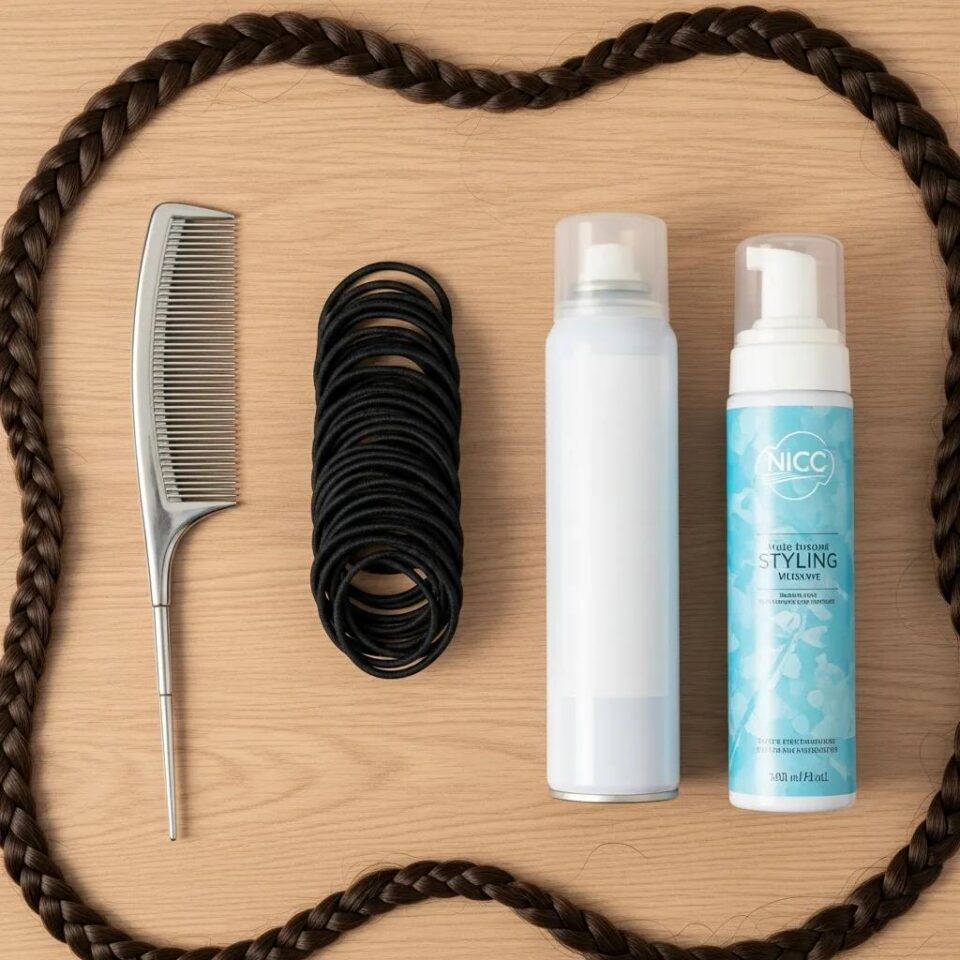
Fine-tooth comb
For creating clean sections. A tail comb works best because the pointed end lets you part hair precisely along the scalp.
Hair ties (2)
One small clear elastic for finishing the braid, plus a backup. Avoid thick ties — they are harder to hide at the end.
Light styling cream
Adds grip so strands hold tension cleanly. Skip if hair is already day-old; freshly washed hair benefits most from cream.
Flexible hairspray
A light mist after braiding sets the hold. Skip stiff aerosol formulas — flexible hold ages better through the day.
Hair washed 24 hours earlier braids better than freshly washed hair. A small amount of natural oil gives strands the grip they need. If you do braid freshly washed hair, light styling cream replaces the missing oil.
How to French braid in 8 steps
Generally, a French braid takes 5 to 7 minutes once you have practiced. Specifically, the first few attempts feel slow as your hands learn the motion. Notably, by the third attempt the muscle memory clicks and the timing speeds up dramatically.
Brush hair smooth and remove tangles
Start by brushing your hair from roots to ends, removing every tangle. Specifically, a French braid relies on smooth strands that can cross cleanly over each other. Knots will catch and create lumps in the braid. Generally, brush longer than you think you need to. Thirty seconds extra at the start saves three minutes of trouble later.
Section the hair at the top of the head
At the front of your head, gather a triangular section of hair. Make it roughly three inches wide at the front hairline, narrowing to a point about three inches back. Specifically, this is the starting section that becomes the top of the braid. Smaller starting sections create tighter, more delicate-looking braids; larger sections create chunkier, more dramatic ones.
Divide this section into three equal strands: left, middle, and right. Hold them between your fingers so they do not tangle.
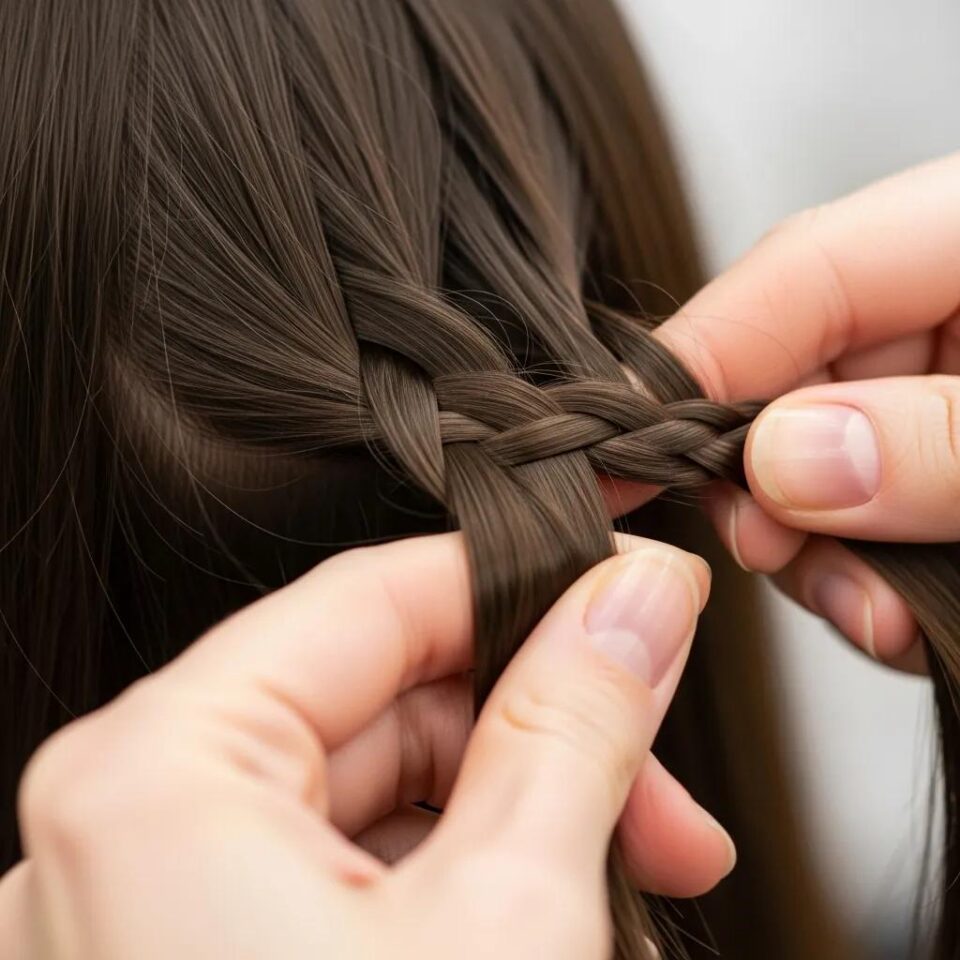
Cross the right strand OVER the middle
This is the key motion of the French braid: over, not under. Specifically, take the right strand and cross it on top of the middle strand. Generally, the right strand now becomes the new middle strand, and the original middle moves to the right side.
Cross the left strand OVER the new middle
Now do the same motion on the left side. Specifically, take the left strand and cross it over the new middle strand. This completes the first full braid loop. Generally, you are essentially doing a regular three-strand braid at this point. Notably, the French braid only becomes a French braid once you add hair from the sides in the next step.
Add a small section of hair to the right strand
This is where the French braid stops being a regular three-strand braid and becomes the woven French style. Specifically, before crossing the right strand over again, pick up a small section of unbraided hair from the right side. Add it to the right strand. Generally, "small" means about half-inch wide. Too much hair creates an uneven, lumpy braid.
Then cross this combined right strand OVER the middle.
Add a small section to the left strand and continue
Mirror the previous step on the left side. Specifically, pick up a small section of unbraided hair from the left side. Add it to the left strand, then cross OVER the new middle. Generally, the key to a symmetrical braid is taking equal-sized sections from each side. If the right sections are bigger than the left, the braid will visually pull to one side.
Continue braiding down to the nape of the neck
Repeat the alternating right-add-cross-over, left-add-cross-over motion all the way down the back of your head. Specifically, you will know you have reached the nape when there is no more loose hair on either side to add in. Notably, this is the point where most beginners notice their braid suddenly feels different — that is normal. The braid transitions from incorporated to regular three-strand.
Finish the tail and secure
Once you reach the nape with no more hair to add, continue the same over-crossing motion. Left over middle, right over middle, on the remaining length. Specifically, this transitions naturally into a regular three-strand braid. Braid down to about an inch from the end, then secure with a small clear elastic.
For a fuller, more dramatic look, gently pull on the loops to make them wider. This technique is called pancaking and transforms a tight French braid into the looser bohemian style.
French braid vs Dutch braid: what is actually different
Generally, both braids start the same way — three strands, sections added from the sides. Specifically, the difference comes down to one motion: French braids cross OVER, Dutch braids cross UNDER. Notably, this small change produces a completely different visual effect.
| Feature | French braid | Dutch braid |
|---|---|---|
| Crossing motion | Strands cross over | Strands cross under |
| Visual effect | Flat, blended into hair | Raised, 3D, sits on top of hair |
| Best for | Everyday wear, weddings, picture day, formal events | Sports, athletic wear, dramatic styles, boxer braids |
| Beginner difficulty | Often harder (flat strands easier to lose) | Often easier (raised strands easier to track) |
| Time to learn | 2-3 attempts for the basic motion | 2-3 attempts for the basic motion |
| Common alias | Plait, classic braid, three-strand plait | Inverted braid, inside-out braid, reverse French |
| Learn order | Learn this one first — foundation for all others | Natural next step after the French braid |
Next: the Dutch braid (under-crossing variation)
Generally, the Dutch braid is the natural next step after mastering the French braid. Specifically, the video below walks through the under-crossing motion that creates the raised, 3D effect.
RaDona's Dutch braid tutorial
The Dutch braid uses the same setup but crosses strands UNDER instead of over. The result is a raised, sculpted braid that sits on top of the hair instead of blending in. Perfect for athletic styles, boxer braids, and bold game-day looks.
The 5 most common French braid mistakes and how to fix them
Generally, every beginner makes the same five mistakes. Specifically, spotting them as they happen cuts the learning curve dramatically. Notably, the fixes below come from 25 years of watching the same patterns in RaDona's salon.
Losing the middle strand
What goes wrong: Your middle strand keeps disappearing into the bigger sections on either side and the braid loses its structure.
The fix: Hold the middle strand against your palm with your thumb. The middle strand should never leave your grip — only the outer strands swap positions around it.
Crossing under instead of over
What goes wrong: You realize halfway through that you have been crossing strands under each other. The braid is sitting raised on top of the head instead of flat.
The fix: You are doing a Dutch braid, not a French. Either commit to the Dutch (which is also lovely) or unbraid and restart focusing on OVER motion.
Sections that are too big or uneven
What goes wrong: The added sections from the side are wildly different sizes. The braid looks lumpy and asymmetrical from the back.
The fix: Aim for half-inch sections every time. Use the back of your tail comb to portion sections — visual measurement helps train your hands.
Tension that is too tight (or too loose)
What goes wrong: Too tight gives a headache by lunchtime. Too loose lets the braid fall apart by the second hour. Either extreme ruins the result.
The fix: Use the same tension you would use to hold a pen. Firm but not gripping. The braid should hug the scalp without pulling.
The braid pulls to one side
What goes wrong: The finished braid sits noticeably off-center. One side is tighter or has bigger sections than the other.
The fix: Picture an imaginary line down the back of your head. Every section added from the right should mirror a section added from the left. Verify symmetry every 2-3 loops, not just at the end.
Braid variations to learn next
Generally, mastering the basic French braid unlocks every other braid in the same family. Specifically, the four variations below all use the same fundamental motion. Notably, each video shows a real RaDona client tutorial.

French Braid Pigtails
Two French braids — one on each side. The classic volleyball and sports hairstyle. Once you can do one French braid, doing two is just twice the practice.

Glimmer Fishtail Braid
The fishtail uses only two strands with woven sub-sections. Different rhythm from the French but uses the same hair-control technique you just learned.

Side Fishtail Braid
Fishtail variation pulled to one side. Wedding-ready and softer than a straight-down braid. Great for prom updos and bridal styling.

Low Chignon Updo
An updo built from a foundational French braid base. Shows how braiding skills extend into formal styling. The natural next step beyond a plain braid.
How to French braid your own hair
Generally, French braiding your own hair is the version most people actually want to learn. Specifically, the technique is identical — but you have to do it by feel rather than by sight. Notably, three adjustments make self-braiding manageable for beginners.
Tilt your head back, not forward
Most beginners instinctively tilt forward to "see" what they are doing. Specifically, this strains the neck and shoulders. Notably, tilting back actually keeps the hair feeling natural in your hands while the mirror catches the angle.
Use two mirrors, not one
Position a handheld mirror behind you and look at it through the wall mirror in front. Specifically, this back-view lets you check symmetry without contorting. Notably, professional stylists use the same trick when working on themselves.
Start with a side French braid, not center
A side French braid (starting at one temple, braiding diagonally across the back) is easier than a perfectly centered French braid for self-styling. Specifically, your arms are already positioned naturally for the side angle. Notably, transition to center French braid only after mastering the side version.
4 essentials for French braiding
Generally, four products handle every braid in this tutorial. Specifically, these are what RaDona keeps on her salon vanity for braiding services.
Fine-tooth tail comb
The pointed end creates clean, precise sections — the foundation of any neat braid. Cheaper to buy in a pack of three than to chase down one when it gets lost.
View on Amazon →Small clear hair elastics
Invisible at the braid end. Buy a 100-pack for less than a single named-brand tie. Use two per braid — one at the base, one further down for extra hold.
View on Amazon →Light styling cream
A pea-size amount applied to clean hair before braiding adds the grip that day-old hair has naturally. Critical for freshly washed hair that would otherwise slip apart.
View on Amazon →Flexible-hold hairspray
A light mist after braiding sets the finished shape. Flexible formulas ages better than stiff aerosol holds — your braid still moves naturally instead of looking shellacked.
View on Amazon →French braid tutorial — eight questions asked most
Generally, a French braid follows eight steps. Specifically: brush hair smooth (Step 1), section a triangle at the top (Step 2), cross right strand over middle (Step 3), cross left strand over middle (Step 4), add a small right section then cross (Step 5), add a small left section then cross (Step 6), continue down to the nape (Step 7), and finish the tail with an elastic (Step 8). Notably, the key motion is OVER — French braid strands always cross over each other, never under.
Generally, most beginners can complete a French braid by the third attempt. Specifically, the first attempt teaches you the over-crossing motion. The second teaches you how much hair to add from the sides. Notably, by the third attempt the muscle memory clicks and the timing speeds up dramatically. Plan to practice on a willing friend or family member before attempting French braiding your own hair, which is significantly harder.
Generally, yes — French braiding your own hair is the version most people actually want to learn. Specifically, the technique is identical to braiding someone else's hair. Notably, three adjustments make self-braiding manageable: tilt your head back instead of forward, use two mirrors (front and handheld behind), and start with a side French braid instead of center. The side version is significantly easier for self-braiding because your arms position naturally.
Generally, French braids cross strands OVER each other while Dutch braids cross UNDER. Specifically, French braids lie flat against the scalp and blend into the hair — the signature look for weddings and formal events. Dutch braids sit raised on top of the hair, creating a 3D sculpted effect best for sports and athletic styles. Notably, both braids start identically and use the same hair-section-adding technique. The only difference is the direction of the cross.
Generally, beginners should follow the 8-step tutorial above and avoid the five most common mistakes. Specifically, the biggest beginner trap is crossing strands under instead of over — which produces a Dutch braid by accident. Notably, hold the middle strand against your palm with your thumb so it never disappears, take equal-size sections from each side for symmetry, and aim for tension like holding a pen — firm but not gripping. Practice on someone else's hair before attempting your own.
Generally, French braids fall apart for three reasons. Specifically, the tension was too loose throughout the braid, the hair was too freshly washed (slippery), or the elastic at the end was too thin to hold the weight. Notably, the fix is using day-old hair or applying styling cream to fresh hair, keeping firm consistent tension, and finishing with a small but sturdy clear elastic. A flexible-hold hairspray applied after braiding adds extra insurance.
Generally, four tools cover 95% of French braid work. Specifically: a fine-tooth tail comb for clean sectioning, small clear hair elastics for finishing (use two — one at the braid base, one further down), light styling cream for grip on freshly washed hair, and a flexible-hold hairspray for finishing. Notably, the comb and the elastics are essential — the cream and spray are optional but make the result hold dramatically longer.
Generally, French braiding works on hair that reaches at least to the collarbone — about shoulder length plus an inch. Specifically, shorter hair often does not have enough length at the back to braid all the way down. Notably, a partial French braid works on shorter hair — start the braid at the top, integrate sections down to the crown, and finish with a regular three-strand braid or just leave the bottom loose. Hair past the collarbone gives the most dramatic full-length French braid result.
Sources & Methodology
Generally, every step and technique in this French braid tutorial comes from RaDona's real salon work. Specifically:
- RaDona's salon experience — 25 years braiding hair on real clients in her Utah salon, including weddings, picture days, sports teams, and dance recitals.
- YouTube channel — 800+ tutorials, 180K+ subscribers, including the French braid video embedded above with thousands of completed views.
- Bon Losee Academy training — formal cosmetology training including braiding techniques.
- Real beginner feedback — the 5 most common mistakes documented here come from watching the same beginner patterns over 25 years of teaching.
- Self-braiding validation — the self-braiding tips tested against real adults learning to French braid their own hair.
- Hair type testing — technique verified across straight, wavy, curly, fine, and thick hair to confirm it works on every texture.
- Tool minimalism — the four tools recommended are the only items RaDona keeps on her salon vanity for braiding services.
Methodology note: The French braid is the foundational braid skill — every other braid uses the same hair-section-adding technique. Generally, mastering it unlocks every other braid in the same family.
Published: Original 2023 · Last updated: May 2026 · Next scheduled review: November 2026.
The complete braiding kit
Every tool and product recommended in this French braid tutorial is curated on RaDona's Amazon storefront. Tested in her Utah salon on real braiding clients — fine-tooth tail combs, clear elastics in bulk packs, light styling creams, and the flexible-hold hairsprays that keep braids looking fresh through a full day.