How to Dutch Braid: Step-by-Step Photo & Video Tutorial
Generally, the Dutch braid is the inverted French braid. It sits ON TOP of the hair instead of inside it, creating a raised look. Specifically, this tutorial walks through 8 clear steps with photos at each stage. You'll also get a full video demonstration and the troubleshooting tips RaDona has been teaching her clients for two decades.
Steps
Braid Time
Has Taught This
Subscribers
What a Dutch braid is, and why it's worth learning
Generally, the Dutch braid is the same technique as a French braid with one key difference. Instead of crossing strands OVER the middle, you cross them UNDER. Specifically, this small change produces a completely different visual result. The braid becomes raised and three-dimensional, sitting on top of the hair rather than blending in. Notably, this is also why the Dutch braid is sometimes called an "inside-out braid" or a "reverse French braid."
If you can do a French braid, you can do a Dutch braid in about ten minutes. If you can't yet do either, start with the Dutch braid. The raised structure makes it obvious which strand goes where. Specifically, this tutorial teaches the technique RaDona has used on hundreds of salon clients. You'll also see the troubleshooting tips that prevent the four common beginner mistakes.
Generally, the Dutch braid is the single most useful braid for sports and active wear. Specifically, it sits flat enough not to catch on helmets and holds through gymnastics practice. It also forms the foundation for boxer braids (double Dutch braids). Notably, every athletic-hair tutorial on this site uses the Dutch braid technique as its base.
Watch the full Dutch braid technique on video
Generally, watching the braid happen in real time clears up the under-crossing motion better than any photo or description. Specifically, this video walks through the technique start to finish. Pause at any step and come back to the photo tutorial below for detail.
RaDona's full Dutch braid tutorial — 14 years of teaching this technique condensed into one video. Pair with the photo steps below.
Before you startWhat you'll need
Generally, you need four things to do a Dutch braid well. Specifically, the right tools matter less for this braid than the right technique. A hair tie and your hands will get you most of the way there. Notably, the items below are the ones RaDona keeps on her own salon vanity for daily braid work.
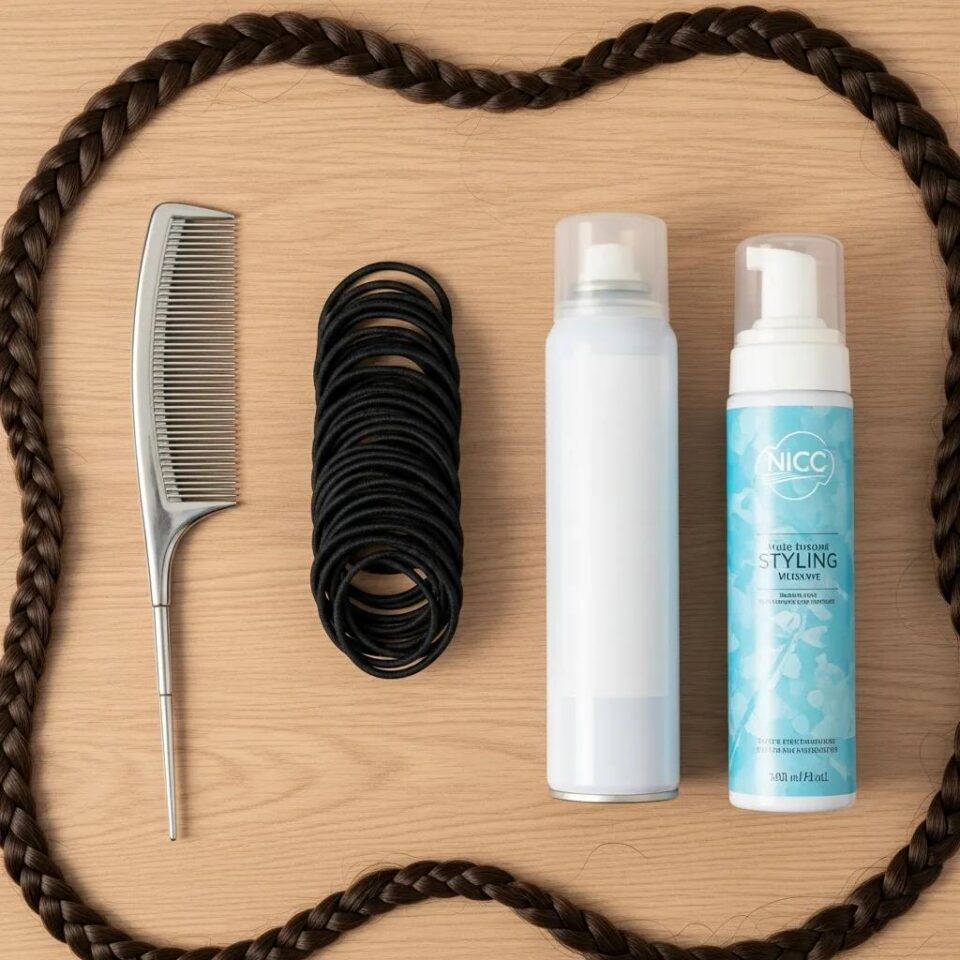
For creating clean sections. A tail comb works best because the pointed end lets you part hair precisely.
One small clear elastic for finishing the braid, plus a backup. Avoid thick ties; they're harder to hide.
Adds grip so strands hold tension. Skip if hair is already day-old; freshly washed hair benefits from cream most.
A light mist after braiding sets the hold. Skip the stiff aerosol formulas — flexible hold ages better.
Specifically, hair that's been washed 24 hours earlier braids better than freshly washed hair. Generally, a small amount of natural oil gives strands the grip they need to hold tension. Notably, if you do braid freshly washed hair, light styling cream replaces the missing oil.
How to Dutch braid in 8 steps
Generally, the Dutch braid takes 7 to 10 minutes once you've practiced. Specifically, the first few attempts feel slow because your hands are learning a new motion — the under-crossing instead of over-crossing. Notably, by the third attempt, the muscle memory clicks.
-
Brush hair smooth and remove tangles
Start by brushing your hair from roots to ends, removing every tangle. Specifically, a Dutch braid relies on smooth strands that can cross cleanly under each other. Knots will catch and create lumps in the braid. Generally, brush longer than you think you need to; 30 seconds extra at the start saves three minutes of trouble later.
Tip: If hair is freshly washed, mist lightly with water or apply a pea-size amount of styling cream before brushing. This adds the grip that day-old hair has naturally. -
Section the hair at the top of the head
At the front of your head, gather a triangular section of hair. Make it roughly three inches wide at the front hairline, narrowing to a point about three inches back. Specifically, this is the starting section that becomes the top of the braid. Notably, smaller starting sections create tighter, more delicate-looking braids; larger sections create chunkier, more dramatic ones.
Divide this section into three equal strands: left, middle, and right. Hold them between your fingers so they don't tangle while you start the braid.
-
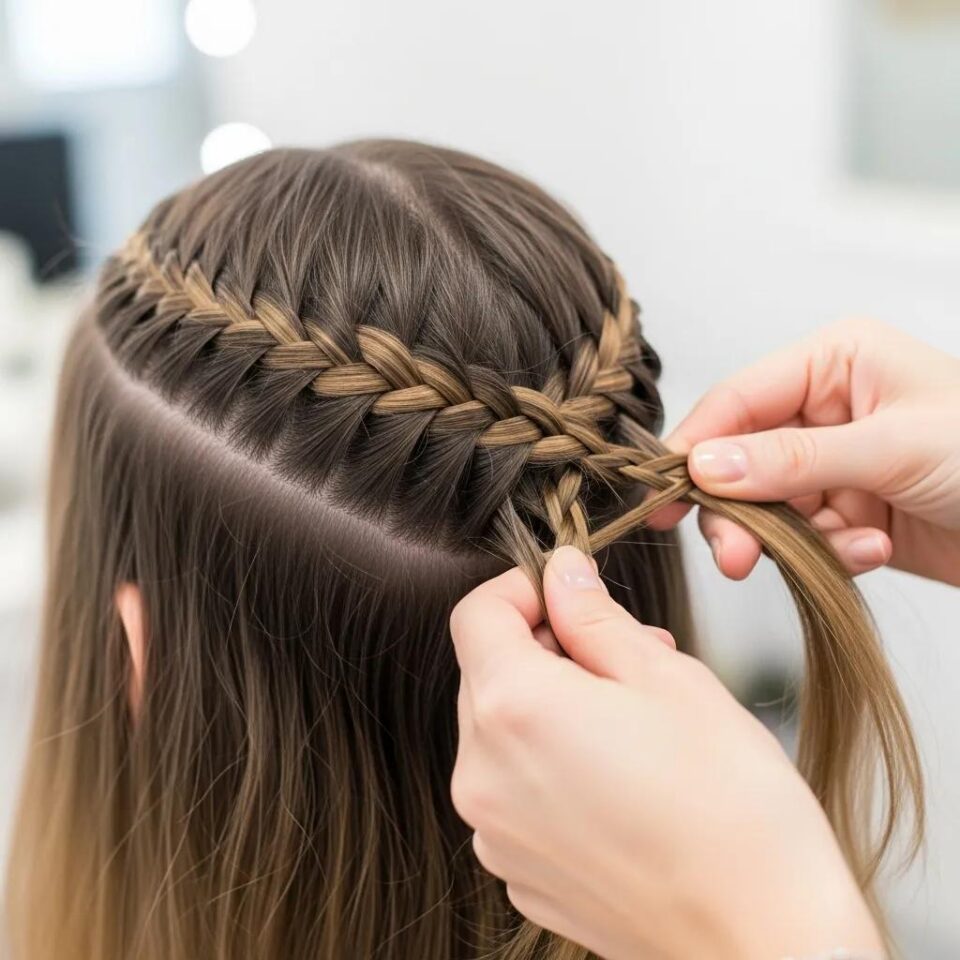
Cross the right strand UNDER the middle
This is the key motion of the Dutch braid: under, not over. Specifically, take the right strand and cross it underneath the middle strand. Generally, the right strand now becomes the new middle strand, and the original middle moves to the right side.
Beginner check: If you can see the strand sitting raised on top of the others rather than tucking into them, you're doing it right. If the strands flatten together, you're crossing over instead of under. -
Cross the left strand UNDER the new middle
Now do the same motion on the left side: take the left strand and cross it underneath the new middle strand. Specifically, this completes the first full braid loop. Generally, you should now see two clear "rungs" of the braid forming on top of the hair, raised and visible.
-
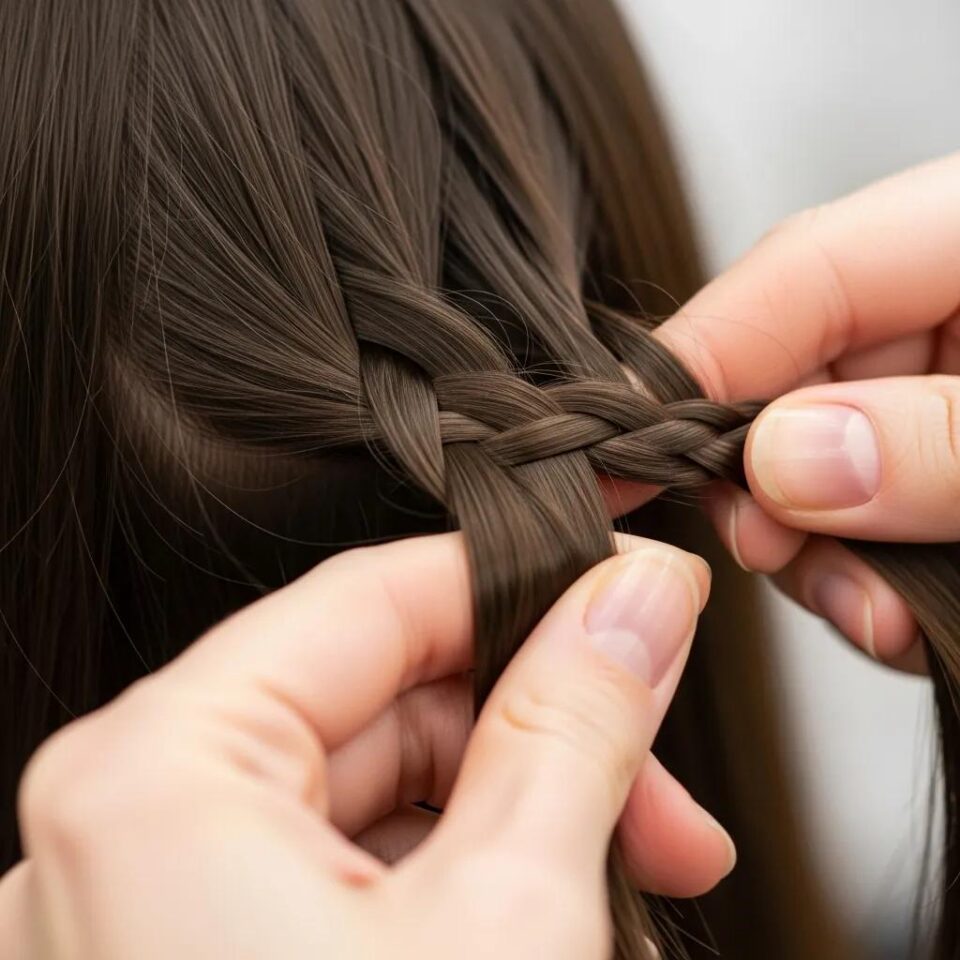
Add a small section of hair to the right strand
This is where the Dutch braid stops being a regular three-strand braid and becomes the woven Dutch style. Specifically, before crossing the right strand under again, pick up a small section of unbraided hair from the right side of your head. Add it to the right strand. Generally, "small" means about half-inch wide — too much hair creates an uneven, lumpy braid.
Then cross this combined right strand UNDER the middle, the same motion as before.
-
Add a small section to the left strand and continue
Mirror the previous step on the left side. Specifically, pick up a small section of unbraided hair from the left side of your head, add it to the left strand, then cross UNDER the new middle. Generally, the key to a symmetrical braid is taking equal-sized sections from each side. If the right sections are bigger than the left, the braid will pull to one side.
Tip: Maintain steady tension on all three strands as you work. Pulling too tight gives a headache; pulling too loose lets the braid fall apart. -
Continue braiding down to the nape of the neck
Repeat the alternating right-add-cross-under, left-add-cross-under motion all the way down the back of your head. Specifically, you'll know you've reached the nape when there's no more "loose" hair on either side to add in. Notably, this is the point where most beginners notice their braid suddenly feels different — that's normal. The braid transitions from "incorporated" to "regular three-strand."

-
Finish with a regular three-strand braid and secure
Once you reach the nape with no more hair to add, finish the remaining length as a regular three-strand braid. Use left over middle, right over middle, no more under-crossing. Notably, switching to over-crossing here makes the tail blend naturally into a regular braid. Specifically, braid down to about an inch from the end, then secure with a small clear elastic.
For a fuller, more dramatic look, gently pull on the loops of the braid to make them wider. This technique is called "pancaking" and transforms a tight Dutch braid into the looser bohemian style.
Dutch braid vs French braid: what's actually different
Generally, both braids start the same way — three strands, sections added from the sides. Specifically, the difference comes down to one motion: French braids cross strands OVER each other, Dutch braids cross UNDER. Notably, this seemingly small change produces a completely different visual effect.
| Feature | Dutch braid | French braid |
|---|---|---|
| Crossing motion | Strands cross under | Strands cross over |
| Visual effect | Raised, 3D, sits on top of hair | Flat, blended into hair |
| Best for | Sports, athletic wear, dramatic styles | Everyday wear, formal events, picture day |
| Beginner difficulty | Often easier (raised strands easier to track) | Often harder (flat strands easier to lose) |
| Time to learn | 2-3 attempts for the basic motion | 2-3 attempts for the basic motion |
| Common alias | Inverted braid, inside-out braid, reverse French | Plait, classic braid |
| Builds on each other | Once you have one, the other follows in minutes | Once you have one, the other follows in minutes |
The 5 most common Dutch braid mistakes and how to fix them
Generally, every beginner makes the same five mistakes. Specifically, learning to spot them as they happen cuts the learning curve dramatically. Catching mistakes mid-braid beats noticing them at the end. Notably, the fixes below come from 25 years of watching clients and students struggle with the same patterns.
Crossing over instead of under
The most common mistake — old French braid muscle memory takes over and the strands cross over rather than under. The result is a flat braid that looks like a French braid, not a Dutch one.
Uneven section sizes
Adding bigger sections from the right than from the left (or vice versa) makes the braid pull to one side and look lopsided. The braid will visually "lean" toward the side with the bigger sections.
Inconsistent tension
Pulling tight in one section then loose in another creates a braid that's bumpy and uneven. The result feels lumpy when you run a hand down the back of the braid.
Losing track of which strand is which
After 5 or 6 cross-unders, the three strands all start to look similar. Beginners often lose track of which is the "right" strand and accidentally cross the same strand twice in a row.
Not finishing the tail with a regular braid
Trying to continue the under-crossing motion after running out of hair to add in. The result is a tail that doesn't quite look right — somewhere between a Dutch braid and a regular braid.
What you can build with the Dutch braid technique
Generally, the Dutch braid is the foundation for at least a dozen popular styles. Specifically, once the basic technique is comfortable, the same motion produces every variation below with small tweaks. Notably, this is why the Dutch braid is one of the most valuable braiding skills to invest practice time in.
| Style | How it uses Dutch braid technique | Best for |
|---|---|---|
| Single Dutch braid | The classic — one Dutch braid down the center back | School, work, casual everyday |
| Double Dutch (boxer braids) | Two Dutch braids, one on each half of the head, parted center | Volleyball, softball, gymnastics, MMA |
| Dutch crown braid | Dutch braid wrapped horizontally around the head | Weddings, communions, formal events |
| Half Dutch / half loose | Top half Dutch braided, bottom half flowing | Picture day, semi-formal occasions |
| Side Dutch braid | Dutch braid running diagonally from one temple | Asymmetric styles, edgy looks |
| Pancaked Dutch braid | Loops gently pulled wider for a fuller, looser look | Bohemian style, beach days, casual events |
| Dutch fishtail | Dutch base with a fishtail tail rather than a regular braid finish | Festivals, prom, advanced styling |
Dutch braiding your child's hair
Generally, kids' hair is dramatically easier to Dutch braid than adult hair. The finer texture, shorter length, and naturally cooperative sections all help. Specifically, RaDona teaches the Dutch braid first to parents because once you can do it on a wiggling 6-year-old before school, you can do it on anyone.
Generally, work fast — most kids tolerate about five minutes of stillness before patience runs out. Specifically, brush the hair the night before to remove tangles, then braid in the morning over smooth, ready-to-go hair. Notably, telling kids the braid "stays in all day for ballet/practice/picture day" gives them a reason to sit still that "because I said so" doesn't.
Children's scalps are more sensitive than adults'. Specifically, the tension that feels normal to you may feel painful to your child. Pulling braids too tight can cause traction alopecia. This is a real condition where hair gradually thins from the hairline due to repeated pulling. Generally, the braid should feel snug but not painful; if your child consistently complains, loosen the tension at the next braid.
Sources & Methodology
Generally, this tutorial reflects 25 years of in-salon experience braiding hair across every age and texture. Specifically, the sources informing the technique and troubleshooting include:
- RaDona's salon experience — 25 years of teaching Dutch braids to mothers, athletes, and brides in Utah.
- RaDona's YouTube channel — 800+ filmed tutorials and 180,000+ subscriber community over 14 years.
- Bon Losee Academy training — formal cosmetology education in braiding fundamentals.
- Reader and subscriber feedback — what beginners consistently struggle with and what tips actually help.
- Real client outcomes — what holds through volleyball games, gymnastics practice, and full school days.
- Industry best-practice guidance — published professional cosmetology references on traction-safe braiding.
- Cross-checking with athletic-hair specialists — input from gymnastics and equestrian coaches on durability requirements.
- American Academy of Dermatology guidance — clinical references on safe braiding tension and traction alopecia prevention.
Methodology note: Specifically, the 8-step structure on this page reflects the breakdown RaDona uses with first-time clients in the salon — slow at first, then incorporating muscle memory. Generally, reader contributions and corrections are welcome — see the contact page. Notably, the tutorial is reviewed and updated as new common questions surface in the comments.
Published: April 2026 · Last updated: May 2026 · Next scheduled review: November 2026.
Dutch braid FAQs
Generally, a Dutch braid is done in eight steps: brush smooth, section a triangle at the top of the head into three strands, cross the right strand UNDER the middle, cross the left strand UNDER the new middle, then start adding small sections of unbraided hair to each strand before crossing under, continue down to the nape, finish the tail as a regular three-strand braid, and secure with a hair tie. Specifically, the key motion is crossing UNDER rather than OVER — that one change is what makes a Dutch braid different from a French braid. Notably, the full photo and video tutorial above walks through every step in detail.
A Dutch braid looks like a raised, three-dimensional braid that sits ON TOP of the hair, with clear visible "rungs" running down the head. Specifically, it's sometimes called an "inside-out braid" because the woven strands appear on the surface instead of being tucked into the hair. Generally, the Dutch braid has more structure and visual texture than a French braid — which lies flat against the scalp. Notably, the raised effect is what makes Dutch braids photograph well and work for sports where you want the braid to stay distinctly separated from the rest of the hair.
Generally, the technique is identical except for one motion: French braids cross strands OVER each other, Dutch braids cross UNDER. Specifically, the result is dramatically different visually — French braids sit flat and blend into the hair, while Dutch braids sit raised on top of the hair. Notably, once you know one, you can switch to the other instantly. Most people find Dutch braids easier to learn first because the raised strands are easier to track visually as you work.
Generally, a Dutch braid takes 7 to 10 minutes once you're comfortable with the technique. Specifically, the first attempt may take 15 to 20 minutes as your hands learn the under-crossing motion. Notably, by the third or fourth practice round, the time drops to under 10 minutes. Double Dutch (boxer) braids take about 15 to 20 minutes total because each side is its own braid.
Generally, yes — Dutch braiding your own hair is harder than braiding someone else's, but it's a learnable skill. Specifically, the trick is to braid by feel as much as by sight, because you can't see what your hands are doing on the back of your head. Notably, the easier variations to do on yourself are side Dutch braids (running diagonally across the front) and Dutch crown braids (visible in the mirror). Most beginners start with side braids before attempting a center back Dutch braid on themselves.
Specifically, if your Dutch braid looks flat and blended into the hair like a French braid, you're crossing the strands OVER instead of UNDER. Generally, this is the single most common beginner mistake because old French braid muscle memory takes over. Notably, the fix is to consciously focus on the "under" motion at every cross — watch for the raised rungs forming on top of the hair as a real-time check. If the rungs aren't raised, you've reverted to over-crossing.
Generally, you need at least shoulder-length hair for a full Dutch braid. Specifically, hair that hits the collarbone or longer braids most easily. Notably, hair shorter than shoulder-length can still do partial or small Dutch braids — a Dutch braid that runs only across the front hairline or a small Dutch braid as part of a longer hairstyle. Very thick hair shorter than shoulder-length may also Dutch braid more easily than fine hair at the same length, because there's more material to work with at each cross.
Generally, three things keep a Dutch braid in place: consistent tension during braiding, the right finishing hairspray, and starting with hair that has slight grip. Specifically, freshly washed hair is too slick to hold a braid well — day-old hair, or hair lightly misted with styling cream, holds much better. Notably, a light mist of flexible-hold hairspray after braiding seals the structure without making it stiff. For all-day sports wear, a few small bobby pins along the braid add extra security.
Keep learning
800+ more tutorials on YouTube
Generally, RaDona films new tutorials weekly. Specifically, subscribe to be notified when the next braid tutorial, haircut tutorial, or styling video goes live. Notably, 180,000+ subscribers already get them every week.